
Here is to Part 1 where I shared stuff about Booking!
For Part 2, I am going to touch on pre-check in till boarding! And do note that we went on the 30 May 2022 sailing for 4 Nights but it was still cruise to nowhere.

Email / App
After booking, there are two places to look out for information – email and Royal Caribbean app. The app can be a tad slow at times but definitely download it now.
You will likely receive emails after emails – leading all the way up to sail day. Based on my experience, there are many just telling to start planning but it basically provides no information! Some are promoting NEW cruise dates. Some are important ones that really apply to your actual cruise trip.
Upgrading your room
Look out for RoyalUP email! Or you can visit this website to check out your eligibility. To be honest, I don’t know if they actually offer it to EVERYONE but makes it sound more desirable by saying you are invited to.
You will need to enter your reservation number and last name. If eligible, you can bid for the room upgrades! It has different starting price for different rooms. Note that the price quoted are for PER PAX and they will charge you for only TWO pax even if your room has 3 or 4.
You can bid for multiple room types at the same time. So you can try your luck for Golden Balcony / Junior Suite / Family Suite even! But do have in mind the price difference to those rooms if you have booked them in the first place.
P/S: Golden Balcony is actually balcony size room that comes with gold class privileges – which includes dining privileges etc! They provide you with some branded toiletries too. While junior suite is way bigger and comes with bath tub but it has silver class privileges. A level lower than gold but still you get to dine in somewhere more premium than everybody else.
Pre-departure ART test
In my 2021 sailing, we had to do PCR test 3 days before at Raffles City, and another ART right before boarding at the cruise centre. However, with the relaxed measures, we only need to take the ART on the same day of boarding (or at least within 24 hours). The earliest is after 530pm of the day before boarding. Do read the emails from them very carefully as rules may changed.
This was still mandatory as of our 30 May sailing and from all the emails that I have been receiving (for my Dec sailing), it looks like STILL mandatory.
Here is screen shot from the email I received.
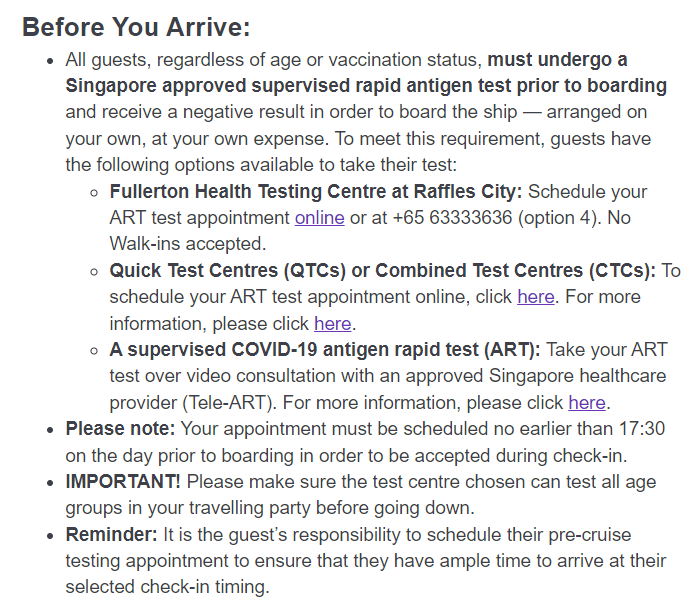
Things to note:
- You will need to make appointment for the tests regardless which option you take.
- The costs are different for each option.
Fullerton Health Testing Centre at Raffles City – SGD 35 (before GST) and kit is provided.
QTCs – SGD 15 (GST inclusive) and kit is provided.
Tele-ART – price vary depending on the service provider but based on what I have searched generally it costs around SGD 21 and you will need to use your own kit which must be HSA-approved. - The time required would be different for each option.
Fullerton at Raffles – you will need to be able to travel there and then proceed to Marina Bay Cruise Centre for boarding with luggages etc. You will need to ensure you get that done prior to the boarding time slot you book.
But basically you register, test and leave – while waiting for results. The rule is you should stay around before you receive the negative results but I guess you could start travelling to MBCC while waiting for the results. That would save you time.
QTCs – This is what we opt for because we have a centre near us. Similarly, we will need to plan the time right but since the centre is near home, we went for breakfast and the test, come back home and took a Grab to MBCC.
The process was very fast. The registration takes a little more time as they would require your email address as well to send you the results and we pay at the same time. Then the staff will prepare the ART kit for you. You just need to swab and they actually do the rest for you. At least that was our experience as there wasn’t a big crowd.
We received the results in 15min actually via sms and email as well as reflected in our TT app.
Tele-ART – This can be done right at home which would be convenient if you cannot find a centre nearby. One of my friends did this on the night before. Just that this will require you to keep the camera on – showing the kit for 15min. - For QTC specifically, do call up the centre / clinic that you are keen to book for to confirm that they are STILL providing the service.
Our experience was horrific. I booked it a week earlier since the dates only open 7days in advance. I wanted to book for the test centre at Hougang Town Centre but there was no morning slots available. So, I booked at Q&M dental.
After booking, I received the confirmation and eventually on the day before the test, I still received reminder SMS from MOH on the appointment.
Unfortunately, when we arrived at the dental clinic, the staff said they are no longer providing the service as of a week ago. They mentioned, “Oh, they (MOH) did not call you?”. Well, I still have the SMS reminder from the day before?! They then suggest we visit their outlet at City Square Mall instead.
I went back to check the MOH site and their clinic was still listed there!
It was already 940am and our boarding time is 130pm. So, while we ate breakfast at McDonald’s, I quickly checked the website again and THANKFULLY, I found the morning slots for Hougang Town Centre – which was located just right outside Hougang Mall. This time, I walked over and asked the staff at the entrance to confirm that this IS AN ACTIVE test centre before I finally felt relieved enough to finish my food.
Pre-Check In
The most important part of this process is to get the earliest boarding time you can get.
The pre check-in should open around 45 days prior to sail day and they would email you too when you can start the pre check-in via the app. DO NOT MISS THIS because the later you do, the less likely you will be able to secure an early boarding time slot!
You will need to choose your preferred boarding time slot – bearing in mind, your negative ART results must be available by then.
At this point, you will need to get all the passport details ready too – to complete the pre check-in and select the time slot. So, if you are travelling with others who are digital savvy, get them to login to the app themselves to do it. Else, do collect their details and have them handy!
Following that, you will be able to do other items at leisure like uploading your photo. They usually take your photo before boarding but if you upload it before hand, you can skip this step – supposed saving time. We did so, but unfortunately, only my hubby’s photo was captured in the system. Maybe because, I uploaded mine and the kids abit too near to actual day. So, because their system did not reflect our photo, we still have to take it on the spot. Not too much hassle though.
You will be also asked to upload your vaccination records. You can go to notarise.gov.sg to download the certificate. I find it very convenient with Singpass and I could also access my kids’ records. I then take screen shots and upload them.
Once uploaded, it will take some time before it says verified but it is fine to just leave it and check back another day.
As for the health check questions, you can only answer them on the day before boarding. You will be prompted with app notification.
You will also be able to access your Set Sail Pass right on your app, so you will not need to print the hard copy. The only thing we printed was the luggage tags. If you would like to drop off your luggages before check-in for the concierge to deliver them to your rooms for you, do print it and attach it to your luggages. You can easily hand over the luggages to the staff and proceed to check-in.
Actual Check-In
While we did EVERYTHING above, unfortunately the process was still not as smooth as I thought it would.
Step 1: Luggage drop off. Smooth! Just hand over to the staff. Once they see you have your tags on, they will take over and you can proceed. This is done before you enter MBCC. There are signs and staff would direct you as well.
Of course, if you prefer to keep the luggages with you, just proceed directly into MBCC.
Step 2: I call it triage. Here is where you need to prepare your passports, Royal Caribbean app, vaccination records and ART results. They would either check your set sail pass or ask for your room number. After entering your room number in their tablet, passengers details would appear. They would start to tally passport details with the system details.
Following that, you will need to show the ART negative results, followed by the vaccination records. By vaccination records, it is NOT sufficient to show them from your TT App which says you are fully vaccinated and even with the effective date. You will be asked to go on to Health Buddy as they need to check specifically every dose record. They checked for my kids as well – where my notarise certificates came in handy.
TIP: Just get all the notarise certificates ready and you can smoothen the process.
Step 4: After the round, which many people faced trouble – trying to login to Health Buddy. We proceed to luggage / bag / human scans.
Step 5: It is the actual check-in station. Again, they will ask for your room number and then they check if the photos are updated in the system. I was expected a very quick process since I did pre check-in as well as the long process at triage but it still took awhile. The staff were nice though.
Step 6: To Immigration! For Singapore passport holders (adults and children above 7) will be directed to the auto gates. So my hubby and Big E (9yo) were directed there while me and Small E (7yo but look tiny) were directed to the manual booths. At manual booths, you will need to look at the camera. Small E needed to provide his thumbprints but I didn’t need to.
Step 7: OFF TO THE SHIP!!!!
Things to pack / prepare
Left this to the end because I think the above information are way more important and less available. Hope this section would be helpful too!
- Swim wear + sun screen
Bring them even if you think nah, I probably wouldn’t go for a dip! It is pretty fun and relaxing. There is jacuzzi!! And there is an adult-only zone called Solarium where you can relax and enjoy away from little kiddos.
Sun screen please! Else you might get burnt! And, don’t just apply them on your face… (Speaking from experience haha) - USB cables for phone charging
The rooms come with USB plugs so you just need to bring the cables along. - Toiletries
We stayed in Balcony room and so the only thing provided was 2-in-1 body wash and shampoo in a container attached on the wall. So don’t forget to bring your own toiletries. Yup, tooth paste / tooth brush / shower cap / comb are NOT provided too. - Extra masks
They do provide ONE piece of disposable mask per adult and kids get a reusable one. We bring them back as keepsake haha. Definitely you will need more masks for the days onboard. - Handy Toys / Activities for kids
You might want to bring these items along to engage the kids during meal times. In main dining room, there will be waiting time before food is served. For buffet, you will need time to go pick up food for various people and yourself.
For those who turn to screen time, you need to take note that either you sign up for the onboard wifi or you need to find ways to save the videos onto your device. I told the kids to download some shows / movies on the phones and Oops, we need network to at least let the app start. So, they couldn’t assess anything at all even though they downloaded the shows on Netflix and Disney+.
That is all for this Part 2. Stay tuned for Part 3 where we will talk about everything onboard! Feel free to email us at thechuasisters@gmail.com to share your own experience or if you have more tips to share with our readers or if there is any information that we should update.
